


Hugelkutltur (or Hugel for short) is a garden bed technique that uses wood and layers of plant matter, topped with compost, to build up moisture-holding beds over time. Hugelkultur beds were first described in Sepp Holzer’s Permaculture book and are now a common technique in permaculture practice. They are common because they are very resilient, hold moisture, and create a wonderful soil web of life. As they mature, Hugel beds will eventually outperform conventional beds (raised beds, regular garden beds) but they take time to “season.” At the Druid’s Garden homestead, we have two kinds of mature hugels – “in-ground” hugels that were created by digging down into the subsoil and “mound” style hugels that were made on the surface. Our in-ground hugels are now 5 years old and our above-ground hugels are three years old, and as they age, like a fine wine, they just get better and better. I’ll show in-progress photos of how both were created and then share some of our experiences in planting, seasoning times, and how to maintain and support hugels each year.
Benefits and Types of Hugels
 Hugekkutltur beds have several distinct advantages over traditional garden beds, particularly in a changing climate. With the hugel approach, you are essentially creating a permanent garden bed that does not get tilled, which creates an incredibly potent soil web, and which can hold much more moisture than traditional garden beds. In an age of climate instabilities, heat waves, and droughts, it is very useful to have a garden bed that will hold moisture and massively outperforms traditional garden beds or raised beds. I have witnessed this firsthand–in 2019 we had a moderate drought in our region and while we were having to water our garden frequently, the hugels required no watering and continued to be lush and green. What basically happens in a hugel is that as the wood starts to break down, it gets very spongy and absorb a lot of water; the hugel design also encourages a lot of biological activity (mycelium, nematodes, good bacteria), creating a very active soil web. Both more moisture and healthy soil mean more healthy and vigorous plants, better able to withstand disease and climate instability.
Hugels are a particularly useful approach if you have access to large amounts of wood (including wood that is half rotting and cannot be used for firewood). A situation like we have at the Druids Garden Homestead is a perfect example–our land was logged before we purchased the property, so much of the forest has a good deal of woody debris that we are working to clear so that we can replant the forest and the small healthy trees can regrow faster. Thus, this is a way for us to turn waste into a resource and build hugels.
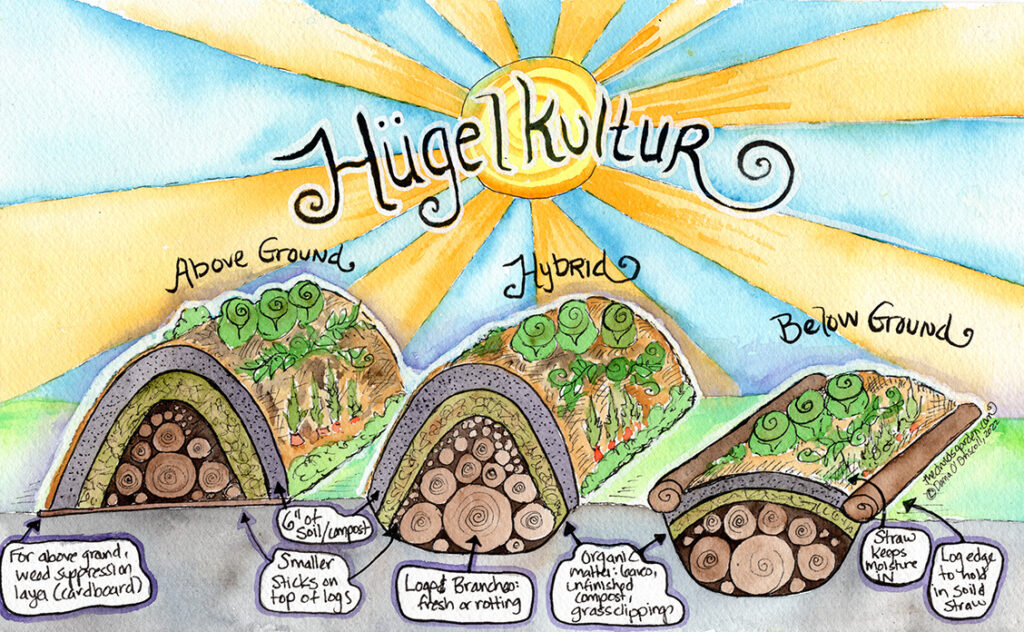
There are essentially two kinds of Hugelkultur beds–those created below the surface of the soil and those created above the soil.
In-Ground Hugels are hugels that are created by digging a pit as wide as you want your garden bed, filling the pit with logs, branches, sticks, and other plant matter, and then covering the pit with lots of soil.
- Benefits: In-ground hugels have the benefit of generally being able to be planted almost immediately (usually right after creation, although they will require tending/watering that first year more than later years). They don’t look like a mound (depending on your design and plans, this can be a benefit). These kinds of hugel beds can be created in any garden setting and can also be employed in greenhouses (I have a hugel bed in my greenhouse).
- Drawbacks: It can be very difficult to dig a large enough pit in the ground. For example, here in PA, it is a battle to dig down even 12″ in our soil since we are in almost solid clay with enormous amounts of rocks. Digging my initial hugel beds was a multi-day excursion with help from friends. Some people choose to use a small backhoe to dig them, which would make it easier, but I avoid that kind of fossil fuel use.
Above-Ground Hugels are mounds where you have piled up logs, branches, sticks, and woody debris and then covered it in soil. The mounds are typically several feet high, which also has the added benefit of creating microclimates that can be more sunny or shady, and more dry (on top) or moist (closer to the bottom).
- Benefits: Above-ground hugels are easier to create since you are essentially eliminating the process of digging below the surface. You can make them as high as you want (which is limited only by your time or resources).
- Drawbacks: I have found that above-ground hugels take longer to season. I have not had success in planting them in the first year–I have found that I prefer to allow them to mature with a cover crop (crimson clover, etc) as most veggies, berries, or other bushes struggle to establish in the first year. By the 2nd year they can be planted and by the 3rd year, you are seeing them really be abundant and productive.
How to Build Hugelkultur Beds

Building your hugels is a pretty straightforward process, but does take some time. Here are the basic requirements:
1. You will need access to woody material–ideally some much larger and thicker and some thinner and smaller (e.g. both logs and branches). Woody material can be fresh, dry, or partially decomposed. Softwoods or hardwoods are best; avoid any woods that contain juglone (walnut, butternut), those that are rot-resistant (Osage Orange, Black Locust, Cedar–save for natural building projects!) or any that inhibit plant growth. There are different discussions about the use of confiers–I’ve used limited amounts of White Pine, Eastern Hemlock, and Spruce without issue).
2. You will need access to other plant matter, a good amount of it–this can be fall leaves, fresh or composted animal bedding (hay, straw, chicken muck), compost (finished or unfinished), and can also make use of sod from the bottom of your bed where you will dig. The idea is that you will need something to fill in the holes in between your logs as you layer and enough to create a thick layer on top of your logs.
3. You will need a large quantity of finished compost or topsoil. Hugels take more soil than you think because you have to cover all of the plant matter fully, and then you want at least 4-6″ of soil on top of that.
4. Consider your site carefully–how will you orient your hugels? A north/south hugel will have one side always in shade and one side always in sun. An east-west hugel will have more distributed light. Many people choose to make them curvy, creating even more microclimates!
Because of these requirements, in my ecosystem (temperate, USDA zone 6, Western Pennsylvania), I find a lot of benefits to creating hugels in the winter months. In the fall, I will create a large pile of leaves and other woody debris from old garden beds to use near my hugel building site, and then after the plants die back, I can go in and pull downed wood out of the forest (we have lots of this from the previous owners’ logging), cutting it with my little battery-powered chainsaw. I can avoid disturbing anything in the ecosystem because the plants are dormant. I remove the top layer of sod/soil, pile up the logs and then add the layers of everything else. I finish it with compost then can plant it in the spring. It is a great winter activity to be outdoors and keep the blood flowing to stay warm!
Building an Above-Ground Hugel
To build an above-ground hugel mound, select your area (ideally, near where the logs you are going to use are). I recommend going through the ground with a garden fork to aerate the soil, and laying a layer of cardboard down first (I would suggest at least 2 layers thick) so that you can suppress any weeds–sometimes they can grow up and through your hugel, especially on the edges. Rather than putting down the cardboard, at this point, you could remove all the sod t use as a resource in the bed (I didn’t do this, but that’s your choice).
Once your surface is prepared, start by putting your largest, thickest logs in a pile in a triangle shape. Fill in the gaps with smaller logs, wood chips, and other compost/woody debris. As you build the pile, the basic idea is to have the largest and thickest logs on the inside of the pile and then work your way out so that the thinner branches and sticks are closer to the outside of the pile. You can make these as tall as you want–the ones I had on my property were originally about 3′ tall but over time they have sunk down to about 2-2.5′ tall as they have matured. Then top everything with 3-4″ of leaves, garden waste, animal bedding, sod, or whatever else you have. Tuck this in between the cracks in the logs.

I thick layer of compost to make sure that the logs don’t have too many air pockets. Air pockets eventually lead to holes and exposed wood (which you can see a bit on my hugels in these photos). After that, I layer leaves, animal bedding, unfinished compost, or whatever else I want. The final layer should be at least 4-6″ of compost. If you are doing this in the fall, then you can add a nice thick layer of straw to help the hugel retain moisture. If you plan on planting immediately, I would add at least 6″ of compost and recognize that the first year may require watering as the logs are not yet retaining moisture.
Building a Below-Ground Hugel
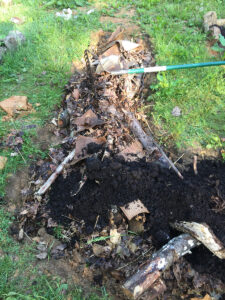
A below-ground hugel mound requires you to first dig out the area where you plan on making the hugel mound. For my meditation garden, friends and I dug through 100% clay and rock down 2.5-3 feet, saving the subsoil for natural building projects like my cob wall in my greenhouse and earth oven (I didn’t want to put that much clay back into the hugel beds!) I saved the sod (top layer) to flip over and work into the logs.

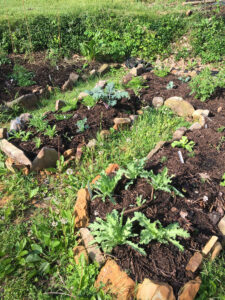
One consideration here is how far down you want to go: the more wood you have in the bed, the more moisture the bed can hold. But the harder it may be to dig down. From there, I added the largest and thickest logs first, and then worked my up to smaller and smaller logs. I kept adding leaves, compost, garden waste, old pumpkins, you name it, as I layered the logs–again to avoid air pockets later. I finished off the beds with a nice stone edge and 6″ of compost. I did plant these right away, but I found that the plants generally did not thrive that first year, so I recommend also letting these season for a season!

You can also add just a log or two to your beds for some additional moisture without doing the whole hugel–they don’t have to be fully hugel beds. For example, I had to dig around my greenhouse’s outer wall to insulate the greenhouse with foam insulation–since I was already down 2 feet, I threw a few big logs on the bottom before covering it up with soil. Not a proper hugel, but does add some extra moisture.

Planting and Tending Your Hugelkultur Beds
This is the part that gets left out of nearly every guide that I’ve seen on making hugel beds–they always tell you how to create them but not how to tend them from year to year! This is why I wanted to write this post–because there’s very little info out there about how to tend your hugels and I had to learn a lot through trial and error.
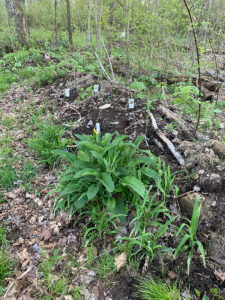
Planting: I have successfully planted both annuals and perennials in my hugel beds, and both have done well. I usually have a mixture of self-seeding annuals and perennials. Because hugels take a year to season, I usually plant a cover crop or easy annual in the first year right after they are made (something like winter rye, crimson clover, lettuce, kale, spinach, etc) and then in the 2nd year, I will plant a mix of annuals and perennials. You can really plant anything in your hugel, although I don’t recommend deep root crops like carrot, parsnip, or potato for quite a few years. Remember that depending on how you orient your hugels, you will likely create microclimates, which can be used to your advantage–you can plant sun/heat-loving crops on the south side of a hugel and more shade-loving or cool crops on the north side of a hugel, for example.
The other thing to think about is how you could grow living manures and living mulches in your hugels to keep soil fertility strong. In one of my largest forest hugel beds, I have giant comfrey plant that I “chop and drop” a few times a season. Comfrey is particularly good at bringing up nutrients (in permaculture design we call it a dynamic accumulator), so the leaves are very nutrient-rich. You can cut it back a few times a year and then either work the leaves into the soil or just lay them on the surface of the soil to add more nutrients. In my forest hugelkultur beds, I also have a lot of gooseberries, raspberries, currant, and other part-shade shrubs and bushes. Because of this, I’ve used strawberry, mint, and sweetgrass as a living mulch–these plants grow in larger mats underneath the berry bushes and prevent the hugel mound soil from being directly exposed to the sun, holding in even more moisture. And of course, I like to add in some some legumes and clovers.
Tending: I have found that hugel beds do require some tending (beyond typical tending for garden beds, like weeding). Specifically, as the hugels season and as the wood rots down, they may will get holes in the bed or sometimes, the wood can shift and become exposed to the surface. To solve this problem, just as the plants are starting to come back up in the spring, I will go through and add as much finished compost as needed, always adding at least 1-2″. Sometimes this means funneling compost down into a hole that has appeared, but often, this means just giving them a nice layer of rich compost. If needed, I will also top with a layer of mulch: if the plants are covering the bed, no mulch is needed, but if the plants are young and spaced out, I will add mulch. Straw mulch is good for annuals while hardwood mulch is good for perennials. Leaf litter can also work if it is not matted (e.g. run it through a leaf shredder and avoid oak leaves that don’t break down). Beyond that, they really require very little attention from year to year.
Hugelkultur and Climate Resiliency
I find that Hugelkultur is an excellent way of making your garden spaces more resilent–the hugels hold moisture which offers drought protection and less work on your part in terms of watering. Hugels encourage a healthy soil web, which provides disease resistance and vigorous plants. Hugels turn what would otherwise be viewed as a waste product (wood, fallen trees, fall leaves and especially partially decomposed wood) into a resource that can be planted for the benefit of you and the living earth. Hugels also lend themselves well to planting polycultures, where many different kinds of plants are working together and creating a diverse ecosystem that not only produces food for humans but also food and habitat for may other creatures (insects, reptiles, birds, etc). Hugelkultur are fun to build, easy to maintain, and will offer you many years and years of wonderful and productive food production.